Ever wonder how to turn website visitors into loyal customers? Integrating a WhatsApp chat directly into your WordPress website is a great place to start. This familiar and convenient communication channel allows you to:
- Answer questions and address concerns in real-time, guiding visitors through the buying process and ultimately increasing conversions.
- Provide a personalized touch by offering WhatsApp chat support, fostering trust and loyalty for a more positive customer experience.
- Capture leads and nurture inquiries the moment they arise. A strategically placed WhatsApp chat widget allows you to collect valuable contact information and nurture leads directly within the chat window, boosting your sales pipeline and lead generation efforts.
Introducing Chaty: The Easy Solution for WhatsApp Chat
Chaty is a WordPress plugin designed to seamlessly integrate multiple communication channels including a WhatsApp chat function into your website. With Chaty, you can unlock the benefits mentioned above and take your customer interaction to the next level. Let’s see how to get started with Chaty and add a WhatsApp chat to your WordPress website in just a few simple steps.
Installing and Activating Chaty
Now that you’ve seen the benefits of adding a WhatsApp chat to your WordPress website, let’s get started with the setup process using Chaty. Here’s a quick walkthrough:
- Log in to your WordPress dashboard. This is typically accessed by navigating to your website’s admin panel URL (usually something like [yourdomain.com]/wp-admin).
- Find and Install Chaty: In the left-hand sidebar menu, locate the Plugins section and click on Add New Plugin. In the search bar at the top of the page, type in “Chaty”

- Activate Chaty: Click on Install Now next to the Chaty plugin. Once the installation is complete, click on the Activate button to activate the Chaty plugin on your website. If you would like a visual guide feel free to click the button below to watch a YouTube video on how to add a WhatsApp chat popup to your WordPress website using Chaty.
Configuring Chaty for WhatsApp Chat
With Chaty activated, let’s configure it to integrate WhatsApp chat functionality into your website.
Multiple Chat Options:
While Chaty offers various chat channels like Facebook Messenger, X, Skype, Waze, WeChat, and Telegram, we’ll focus on setting up WhatsApp chat in this article.

1. Access Chaty Settings:
Navigate back to your WordPress dashboard sidebar menu. Locate the Chaty menu item and click on it. This will open the Chaty dashboard page.
2. Choose WhatsApp:
On the dashboard, click on Create New Widget and look for a section titled Choose your channels. This section will list all supported chat channels. Find the WhatsApp icon and click on it to enable it.

3. Enter Your WhatsApp Number:
Once you’ve selected WhatsApp, select your country code and type in your WhatsApp Number. For example, if you’re in the United States, you would enter +15551234567.
By following these steps, you’ve successfully configured Chaty to use WhatsApp as your chat channel. Now, website visitors can initiate chat conversations directly with your chosen WhatsApp number.
Customize Your WhatsApp Channel Widget
Chaty allows you to personalize the appearance and behavior of the WhatsApp chat widget to match your website’s branding and enhance user experience.
Here’s a glimpse of what you can customize :
- Icon Appearance: Change the icon, color scheme, and add a custom image to seamlessly integrate the overall look with your website’s design.
- Welcome Message: Craft a personalized message that appears when visitors click on the chat widget. This can be a friendly greeting or a quick introduction to your business. You can enable this by toggling the “WhatsApp Chat Popup” button.
- Multiple Chat Agents: Add as many agents as possible to manage chats from multiple WhatsApp accounts. Also, add their names and titles for better support

- WhatsApp Preset Message: Create your own pre-set message with tags that will automatically accompany the customer’s message when they click on WhatsApp. For example, you can include the page title, URL and other relevant properties when someone sends you a message from that specific page. This helps you identify the webpage the customer was on and enables you to provide more contextual and efficient support.
Widget Customization
Enhance the appeal and functionality of your WhatsApp popup by customizing various aspects to suit your website’s style and user experience.
1. Chat View: Choose from different chat view options- simple view and chat view to match your website layout and design.
2. Positions: Determine where the WhatsApp chat button or widget should appear on your website, whether it’s at the left or right side of your website, or positioned at a specific corner.
3. Default State: Decide how the chat widget behaves initially – whether it should be click-to-open, open on hover, or remain open by default when the page loads.
4. Attention Effects: Add attention-grabbing effects to make your WhatsApp chat channel and other communication channels stand out. Choose from options like fade-in, spin, sheen, waggle, bounce, or none for a subtle or eye-catching animation.
5. Customization Options: Explore additional customization options such as color themes, button styles, and chat bubble designs to align with your brand’s aesthetics and enhance user engagement.
By customizing these elements, you can create a more engaging and seamless chat experience for your website visitors, making it easier for them to connect with you and access support whenever they need it. Experiment with different settings to find the combination that best suits your website’s overall look and feel while ensuring optimal functionality and user satisfaction.
Triggers and Targeting
This section in Chaty provides you with options to determine when to display the chat channel on your WordPress website and who can see it. You can utilize these rules to show the chat on specific pages by adding rules for date scheduling, days and hours, traffic source, country targeting, and custom CSS to enhance the appearance of your chat channel.
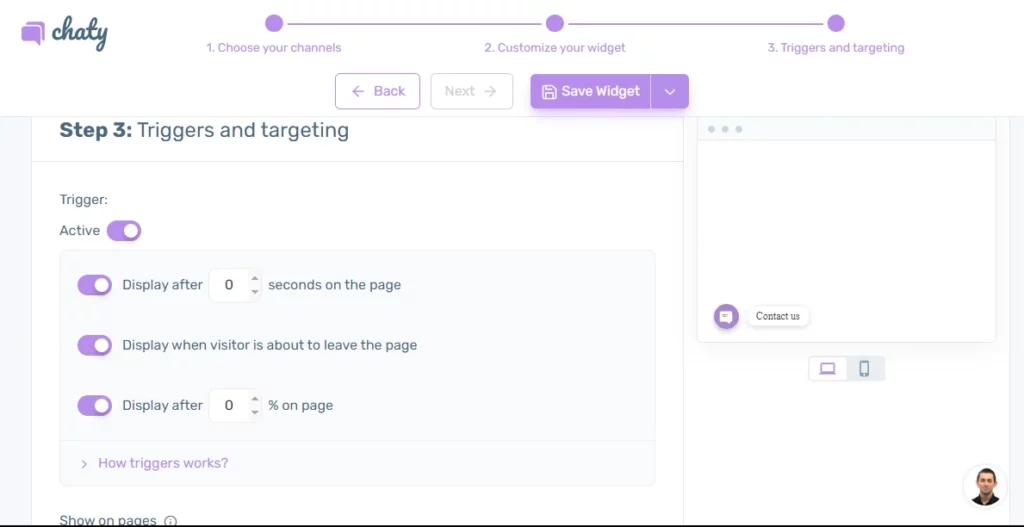
After configuring these settings, click ‘Save Widget’ to apply the changes to your widget.
Launching the Chat Widget and Testing
Congratulations! You’ve successfully completed the setup process for adding a WhatsApp chat to your WordPress website using Chaty.
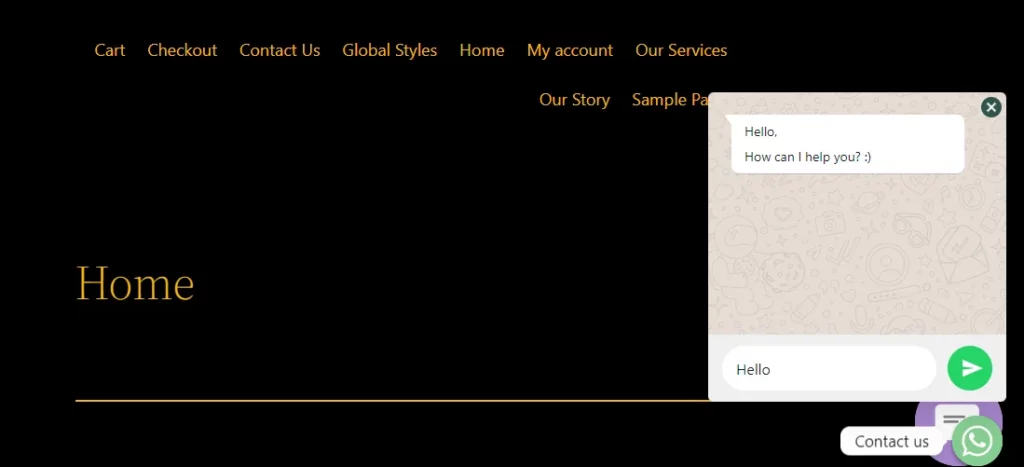
Ready to Chat!
With the configuration finished, your WhatsApp chat widget should now be live on your website. Visitors can easily initiate chat conversations directly with your chosen WhatsApp number. Below is an example of how the WhatsApp chat popup might look on your website. Remember, you can customize its appearance to fit your preferences.
Testing the WhatsApp Chat Widget:
It’s always a good practice to test your newly implemented chat functionality. Open your website on different devices (desktop and mobile) and try clicking the chat widget to ensure it functions as expected. This will give you peace of mind that visitors can successfully initiate chat conversations with you on your website.
Conclusion
In conclusion, adding a WhatsApp chat to your WordPress site can significantly improve your customer communication and engagement. With Chaty, this process is simple and convenient. Why not give it a try today and see the difference it can make for your website?
Unlocking Chaty Pro(Optional)
As mentioned earlier, Chaty offers a free plan with core functionalities. However, if you’re looking to unlock the full potential of WhatsApp chat for your website, consider exploring the features available in Chaty pro plans. These features include:
- Traffic source targeting: Tailor your chat visibility based on where your visitors are coming from, enhancing personalized engagement.
- Multiple agents: Collaborate efficiently by assigning chats to different team members for quicker response times.
- Country targeting: Customize chat availability based on visitors’ geographic locations for targeted support.
- Date scheduling: Schedule chat availability based on specific dates, ensuring timely customer assistance.
- Available days and hours: Set chat hours according to your team’s availability, optimizing resource allocation.
- Preset tags for WhatsApp: Streamline conversations by using preset tags that provide context and categorize messages.
- Analytics integration: Gain insights into chat performance and visitor interactions for data-driven improvements.
By leveraging these advanced features, you can transform your WhatsApp chat into a powerful tool to drive engagement, streamline communication, and ultimately achieve your business goals. We encourage you to experiment with Chaty and explore the features that best suit your needs. With a well-integrated WhatsApp chat on your WordPress website, you’re well on your way to fostering stronger customer relationships and growing your business.