In this guide we’ll show you how you can launch and close your Coupon X widget using a link or a JavaScript function in a few super simple and quick clicks. Click to read more about how to use Coupon X for Shopify or Wix.
You can use this feature to launch or close your widget from anywhere on your website, through a button, and with whatever criteria you want to be met, for example you can only show the widget after other JavaScript commands fire or hide it after a JavaScript command fires.
How to launch your widget
Let’s take the example from above. To launch the discount widget with a JavaScript function, first, open the Products page in your Shopify admin panel. You can either add a new product or edit a currently existing one. Follow the steps in giving/ editing your product name and in the description box add an image of your choice. This image will serve as your custom ”button” that visitors will click to launch the Coupon X widget. Click on the image you just uploaded, then click on the ”< >” button to see the image HTML code. This is where you need to add the JavaScript function.

You need to add this right before the image tag (the image tag will already be there when you upload a picture).
Important!: make sure you close the tag accordingly by putting in the end, as shown in the screenshot below:
<a href="javascript:launch_coupon_x();">
You can also use this code with a number inside the brackets, e.g. (1), (2) if you have more than one widget in that page.
When you’re done, don’t forget to hit ”Save” at the top of the page. That’s it! Easy as 1,2,3
The image you uploaded will then act as a custom ”button” and when your visitors click on it, the discount code widget will launch for them. In the end, it should look something like this on your website:

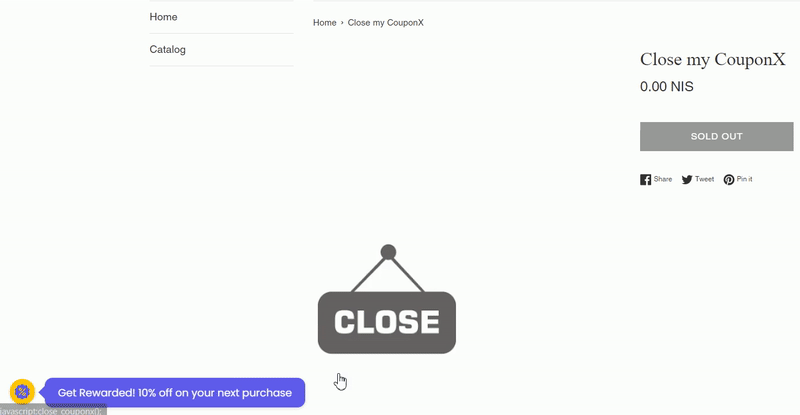
How to close your widget
To close the discount widget with a JavaScript function, first, open the Products page in your Shopify admin panel. You can either add a new product or edit a currently existing one. Just like above, follow the steps in giving/ editing your product name and in the description box add an image of your choice. This image will serve as your custom ”button” that visitors will click to close the Coupon X widget. Click on the image you just uploaded, then click on the ”< >” button to see the image HTML code. This is where you need to add the JavaScript function.

You need to add this right before the image tag (the image tag will already be there when you upload a picture).
<a href="javascript:close_coupon_x();">You can also use this code with a number inside the brackets, e.g. (1), (2) if you have more than one widget in that page.
When you’re done, don’t forget to hit ”Save” at the top of the page. That’s it! Easy as 1,2,3
The image you uploaded will then act as a custom ”button” and when your visitors click on it, the discount code widget will close for them. In the end, it should look something like this on your website: