In this guide we’ll show you how you can display your Sticky Floating Contact Form widget on specific pages on your website in a few super simple and quick clicks. To learn more about how to use the app, click here.
With this feature you can customise your widget so that it only appears on specific pages, depending on your preferences or based on your visitors’ browsing habits. That way the widget won’t be displayed on your main page and will instead be visible when visitors are on your FAQ page, for example.
First, open the Sticky Floating Contact Form app in your Shopify admin panel. The app settings menu will open up.
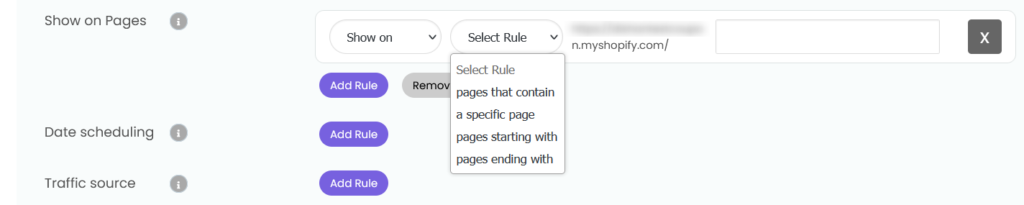
Go to Step 3: Display and behaviour settings > Triggers and targeting, scroll down the page and look for the ”Show on pages” option. Please note it’s available for pro users only.

Click on ”Add rule”. You can now decide whether to show or not to show the widget on specific pages. You can use rules like ”contains”, ”specific page”, ”starts with” and ”ends with”.
Important!: if you have more than one widget, but don’t want to have more than one widget on a certain page, you should exclude this page you from the other widgets you have. For example, if you set ”Show on pages that contain {{something}}” for Widget A, make sure that you set ”Don’t show on pages that contain {{something}}” for Widget B.”
When you’re done setting up your days and hours setting, don’t forget to hit ”Publish” at the bottom of the page. That’s it! Easy as 1,2,3 ☺️
Now your Sticky Floating Contact Form widget will only be displayed on the specific pages you have just selected.
You can also read about how to set up date scheduling targeting and traffic source targeting by clicking on each of the respective links.