In this guide we’ll show you how to create another Sticky Floating Contact Form widget. You can have different widgets to use with different targeting rules, for example on different pages, on different days and hours, with different channels, etc. It’s totally up to your preferences!
Note: please note this feature is available for Pro users only.
This feature is useful since you can create different widgets with different targeting rules depending on your needs and preferences. Below is a short overview of the targeting rules you can set up.
Page targeting
With this feature you can customise your widget so that it only appears on specific pages, depending on your preferences or based on your visitors’ browsing habits. You can find a separate guide on how the feature works here: https://premio.io/help/sticky-form-for-shopify/how-to-display-you-widget-on-specific-pages/
Days&hours targeting
With this feature you can customise your widget so that it only appears on specific days or in specific hours, depending on your business working hours and availability, or based on your visitors’ browsing habits.
Date scheduling targeting
With this feature you can schedule in advance to show your widget on specific dates and in specific hours, for example for an upcoming campaign. This feature is also useful if you want to offer time-limited support. You can find a separate guide on how the feature works here: https://premio.io/help/sticky-form-for-shopify/how-to-set-date-schedule-targeting-for-your-widget/
Traffic source targeting
With this feature you can display your widget exclusively to users that came to your website from specific traffic sources including direct traffic, social networks (e.g. Facebook), search engines (e.g. Google), Google Ads or any other traffic source or website. You can find a separate guide on how the feature works here: https://premio.io/help/sticky-form-for-shopify/how-to-set-traffic-source-targeting-for-your-widget/
Country targeting
With this feature you can display your widget exclusively to users from a specific country/specific countries.
So how to create a new widget? Let’s get right into it. Start by opening the Sticky Floating Contact Form app in your Shopify admin panel. In your app dashboard you’ll see a ”Create New Widget” button as well as a table with your current widgets and their statistics. You can activate or deactivate a widget from the ”Status” option to the left of the table. To create a new widget, click on the ”Create New Widget” button.

You’ll be automatically redirected to the widget customization and configuration settings.
Note: when you return to your dashboard, you’ll notice the widget you just created will show up at the bottom of the table, below your previously existing widgets.
You can then start to personalise your widget according to your needs and preferences, including giving your new widget a name (it will be automatically named ”My widget #”) and customizing it in terms of fields, position, colours, font, size, targeting options.
The first step is to set up your contact form settings from Step 1: Add contact form by choosing among the fields, giving them a personalised name and choosing whether each of them is required or optional. You can also add custom fields to your contact form to further personalise it.
You can find a step-by-step guide on how to do that here:
https://premio.io/help/sticky-form-for-shopify/how-to-add-custom-fields-to-your-contact-form/
Next, you can choose whether to show your widget on desktop or mobile or both, set up custom colours and text.
For more details on how to set up and use your contact form, please check this easy visual guide: https://premio.io/help/sticky-form-for-shopify/how-to-use-the-sticky-floating-contact-form-for-shopify/
After you are done setting up your contact form tab settings, move on to adding chat and social media channels from Step 2: Add chat & social media.
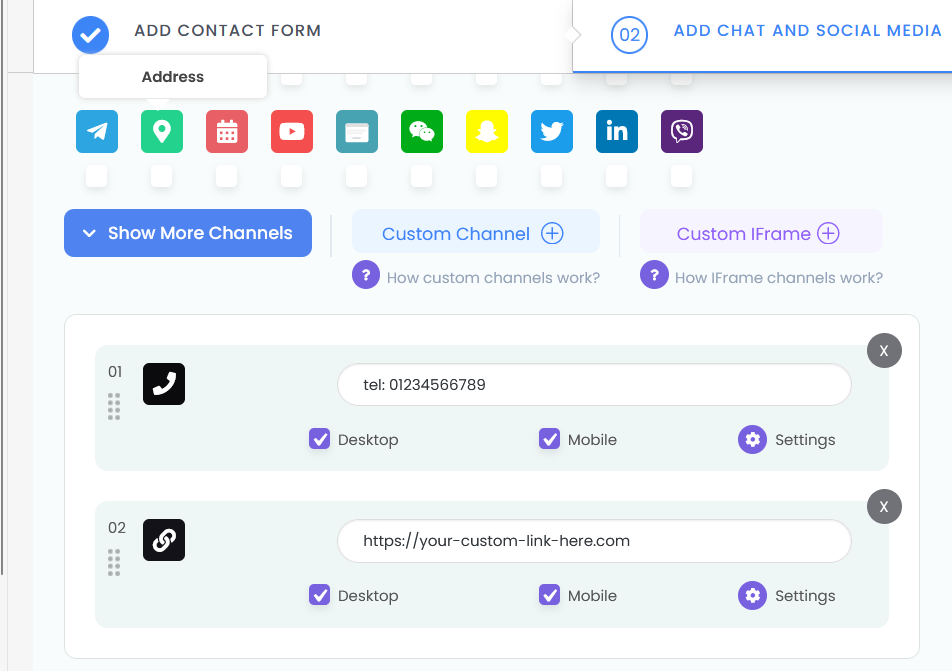
Please refer to this guide on how to set up social and communication channels in your Sticky Floating Contact Form widget here: https://premio.io/help/sticky-form-for-shopify/how-to-add-custom-chat-social-network-channels-to-your-widget/
For more information on how to add a custom iFrame/ HTML channel, you can check this article: https://premio.io/help/sticky-form-for-shopify/how-to-add-a-custom-iframe-html-channel-to-your-widget/
Finally, you can set custom templates, positions, display rules, size and triggers and targeting rules from Step 3: Display & behavior settings. This is the most useful for your new widget page, since the difference between your widgets will mostly be in how you target them.
First, choose a template for your widget – whether the buttons will appear rounded, square or diamond – it’s all up to you! Choose the widget position on desktop and mobile, set up tracking clicks with Google Analytics, choose your widget size and entry effect and add pages, days and hours, date scheduling, traffic source and country targeting rules for your new widget.
When you’re done setting up your country targeting, don’t forget to hit ”Publish” at the bottom of the page. That’s it! Easy as 1,2,3 ☺️