In this guide we’ll show you how to use the Chaty chat view layout.
This is a new functionality that allows you to switch from the classic Chaty widget view (vertically or horizontally aligned channels) to a modern-looking chat-like layout.
Besides a design change, this feature also brings some more useful features such as a personalized touch using merge tags like page title, URL, and WooCommerce tags like product namethanks t our new WooCommerce integration for an improved user experience on your website. Please note this is available for Pro users only.
So let’s get right into it.
Step 1: Open the Chaty settings from your WordPress admin panel and click on Edit next to your widget. If you don’t have one, create a new widget.

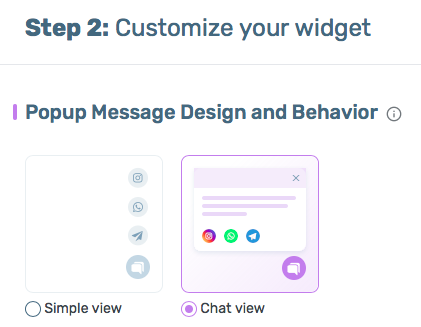
Step 2: After completing the first step of the settings, move to Step 2: Customise your widget. In the first setting – Popup Message Design and Behavior – select the Chat view option.
Step 3: Scroll down and you will see the additional settings that come with this feature.

First, you need to add a popup heading text for your popup. This is the text that will appear at the top of the popup box, for example “Welcome!”. You can also add properties to the heading text by clicking on the “Add properties” button below. These are the so-called merge tags {URL} and {title} that will automatically fetch the URL or page title of the relevant page, meaning they will change from page to page for even further personalisation.

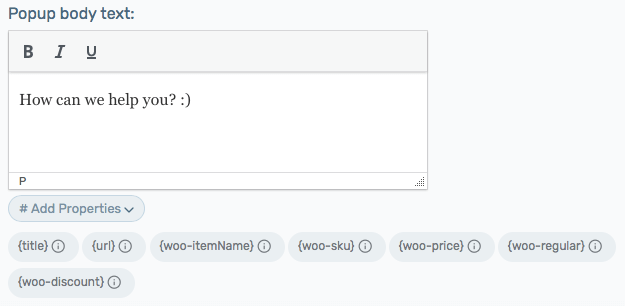
Step 4: Now it’s time to add your custom popup body text. This is the main text of the popup, for example: “How can I help you?”. Again in this step you can add the so-called merge tags {URL} and {title} that will automatically fetch the URL or page title of the relevant page, by clicking on the “Add properties” button below.

Step 5: Move on to the “Customization for WooCommerce” button. This step is optional and requires having WooCommerce installed on your site. You can toggle the button next to the feature to enable it. You can use this feature to show customized pop-ups on your WooCommerce product pages using Chaty.

First, add a popup heading text for your Woocommerce popup. Unlike the regular popup heading text, where just {URL} and {title} tags are supported, here you can also use the following Woocommerce-related tags, besides the {URL} and {title} ones: {woo-itemName} – to show the Woocommerce product name, {woo-sku} – to show the Woocommerce product SKU, {woo-price} – to show the Woocommerce product price, {woo-regular} – to show the Woocommerce product regular price and {woo-discount} – to show the Woocommerce product sale price. You can add one or more tags at a time.

Finally, move on to the Woocommerce popup body text. Here too you can add the main text of the Woocommerce popup and use the same merge tags.
And that’s it – in the end the popup may look like this on your website, depending on your settings and customisations.

You can proceed with the next step of customising your widget.
Still have questions? Ping us at our Facebook group, and we’d love to help out!